How to Upload Sensor Data to Cloud - ThingSpeak
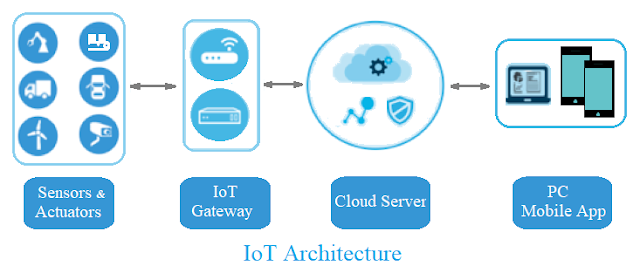
This project focuses on transforming your NodeMCU into a gateway device, facilitating the uploading of sensor data to the ThingSpeak server. This tutorial provides instructions for users to gauge ambient temperature and humidity, with the recorded values transmitted to a personal cloud server on ThingSpeak every 15 seconds. This enables users to visualize both sets of data on a web page. To accomplish data transmission to ThingSpeak using a NodeMCU, it is essential to have a NodeMCU with network connectivity. Additionally, ThingSpeak necessitates a user account and the creation of a channel, which serves as the destination for sending and storing data.
Requirements:
- NodeMcu-12E (ESP8266)
- DHT-11
- Jumper Wires
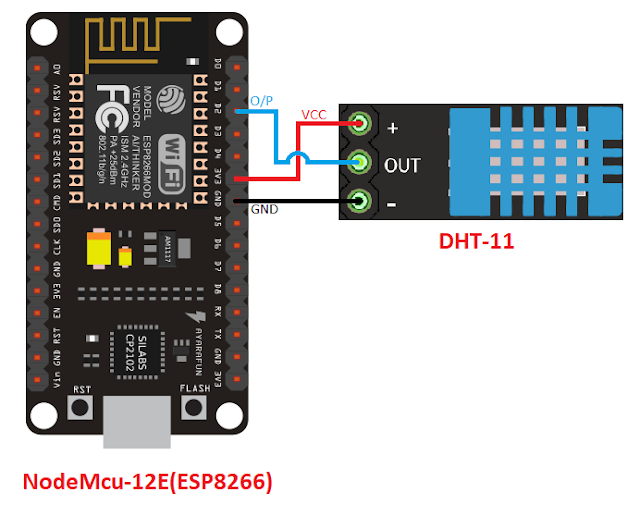
Connection Diagram:
Sign Up For ThingSpeak:
Visit https://thingspeak.com/ and create an account.
Generate a new channel, and subsequently, navigate to API keys. Copy the API key and paste it into your program.
Code:
#include
<ESP8266WiFi.h>
#include
<DHT.h>
#define
DHTPIN D2
#define
DHTTYPE DHT11
DHT
dht(DHTPIN, DHTTYPE);
const
char* ssid = " Your Wi-Fi Network name"; // replace with your Wi-Fi ssid
const
char* password = " Wi-Fi Network Password ";
const
char* host = "api.thingspeak.com";
const
char* privateKey = " Your thingSpeak API Key"; / Enter your Write API
key from ThingSpeak
void
setup() {
Serial.begin(115200);
delay(10);
//
We start by connecting to a WiFi network
Serial.println();
Serial.println();
Serial.print("Connecting
to ");
Serial.println(ssid);
WiFi.begin(ssid,
password);
while
(WiFi.status() != WL_CONNECTED) {
delay(500);
Serial.print(".");
}
Serial.println("");
Serial.println("WiFi
connected");
Serial.println("IP
address: ");
Serial.println(WiFi.localIP());
}
float
value, temp;
void
loop() {
delay(15000);
float
h = dht.readHumidity();
float
t = dht.readTemperature();
Serial.print("connecting
to ");
Serial.println(host);
//
Use WiFiClient class to create TCP connections
WiFiClient
client;
const
int httpPort = 80;
if
(!client.connect(host, httpPort)) {
Serial.println("connection
failed");
return;
}
//
We now create a URL for the request
String
url = "/update";
url
+= "?api_key=";
url
+= privateKey;
url
+= "&field1=";
url
+= t;
url
+= "&field2=";
url
+= h;
Serial.print("Requesting
URL: ");
Serial.println(url);
//
This will send the request to the server
client.print(String("GET
") + url + " HTTP/1.1\r\n" +
"Host:
" + host + "\r\n" +
"Connection:
close\r\n\r\n");
delay(10);
//
Read all the lines of the reply from server and print them to Serial
while(client.available()){
String
line = client.readStringUntil('\r');
Serial.print(line);
}
Serial.println();
Serial.println("closing
connection");
}
Output:
Output:
Open
your Thingspeak account and click on channel private view, output will be shown
as graph.
For Additional Projects Click Below Links:

Subscribe to:
Post Comments
(
Atom
)
Internet of Things
What is Internet of Things?
What is IoT? The Internet of Things (IoT) is the network of physical objects/things are embedded with software, sensors, and hardw...


No comments :
Post a Comment