Bluetooth Control App using MIT App Inventor
To design a Bluetooth Control App using MIT App Inventor, follow the steps below:
MIT App Inventor website:
Click on this link ai2.appinventor.mit.edu.
Log in to MIT App Inventor:
Log in with your Gmail account to initiate the development of your Android application. Navigate to the "Projects" menu or menu bar and choose "Start new project." Provide a name for your project and click the "OK" button to proceed.
Upon completing the previous steps, you will enter the application development section. In this area, you can design the layout of your app using the "Designer" and implement its functionality using "Blocks."
Designer Panel:
Select "Layout" from the Palette and select "Horizontal Arrangement." Drag and drop this onto your blank screen. This component will serve as the container for all the interface elements in your app.
Select properties > Image and upload the image to display.
Navigate to the Properties section in the right corner of the page. Adjust the Height property to 100 pixels and set the Width property to Fill Parent.
Select the ListPicker component from user interface. ListPicker is the
button, which displays the list of available bluetooth devices and handle the
selection.
Select properties
> Text and change the text display. You can also change the height,
width, color using the properties panel.
Select properties > Image and upload the image to display.
Choose image file from your computer.
Select Layout
> from palette and select Horizontal arrangement. Horizontal arrangement
component is to display a group of components laid out from left to right. We
are using this component to display two buttons horizontally which is “ON” and
“OFF”. We need 4 Horizontal Arrangement with same properties.
After this, click and hold on the word “Button” in the palette, drag
your mouse over to the Viewer and drop the button over the horizontal view and
do same by dragging another button. These two buttons will look left to right.
Rename the buttons from “Button1 to LED1ON” and “Button2 to LED1OFF”. Also
change the text and background colour of buttons from properties, which will
display on users screen.
At last, connectivity from palette select Bluetooth Client and drag and drop to the viewer panel. Note that, this is the Non-visible component.
Add a label text , as a status about Bluetooth connection(remove text in properties Text option).
At last, connectivity from palette select Bluetooth Client and drag and drop to the viewer panel. Note that, this is the Non-visible component.
Final app will look like the above image. You can change color, text,
width, height , background of the components.
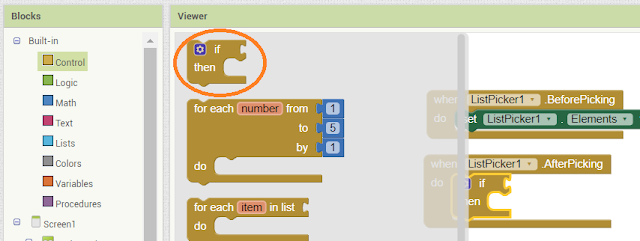
Again click on list picker and select ListPicker After Picking and attach the if Built-in condition from control block.
The Blocks Editor is where you program the behaviour
of your app. There are Built-in blocks that handle things like math, logic, and
text with each components you have added.
Click on the list picker and select ListPicker Before Picking.
Click on listpicker and attach Set elements block as shown in below.
Click on Bluetooth Client and attach AddressesAndNames to Elements.
Again click on list picker and select ListPicker After Picking and attach the if Built-in condition from control block.
Click on Bluetooth Client and attach .connect, Addresses to if condition
like as shown in below.
Click on Listpicker and drag selection block and attach it to Bluetooth
client.
Click on Label and drag Text block and attach it to “then” condition.
Click on Built-in Text and drag empty block and attach it to Text label.
By clicking on the image on App Screen, It will show you paired Bluetooth connections and click on your Bluetooth devise name. It will established communication between selected device and display the text on App screen Bluetooth Connected.
By clicking on the image on App Screen, It will show you paired Bluetooth connections and click on your Bluetooth devise name. It will established communication between selected device and display the text on App screen Bluetooth Connected.
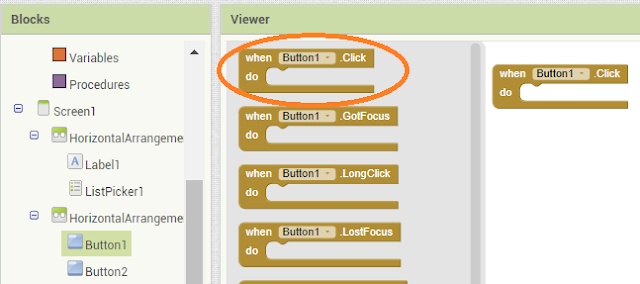
Click on Button and drag the when Button1 .click block.
Click on Built-in Control block and drag if condition and attach to
Button1 as shown in below.
Once your app is finished download apk and install it in Android Mobile.
For Arduino Bluetooth Project Click on below link:
Control LED Using HC-05 Bluetooth, Arduino And Mobile App
Click on BluetoothClient1 and drag isConnected block
and attach it to If condition.
Again Click on BluetoothClient1 and drag .sendText, Text block and
attach it to “then” condition.
Click on Built-in Text and attach empty text box to
BluetoothClient as shown in below.
Follow these steps to remaining Buttons and change
text in Text boxes as you required.
Final app blocks will look like the below image.
Once your app is finished download apk and install it in Android Mobile.
For Arduino Bluetooth Project Click on below link:
Control LED Using HC-05 Bluetooth, Arduino And Mobile App

Subscribe to:
Post Comments
(
Atom
)
Internet of Things
What is Internet of Things?
What is IoT? The Internet of Things (IoT) is the network of physical objects/things are embedded with software, sensors, and hardw...


No comments :
Post a Comment