How to control Servo Motor using Arduino
To control Servo Motor using Arduino, read the steps below:
To control a Servo Motor using an Arduino, follow this experiment with the steps outlined below. This experiment demonstrates how to connect a Servo motor to an Arduino, and provides example code for you to incorporate Servo motor control into your projects.
Components Required:
- Arduino Uno with USB 2.0 Cable
- Servo Motor
- Jumper Wires
Arduino Uno with USB 2.0 Cable:
Arduino is an open-source electronics platform that combines user-friendly hardware and software, catering to individuals involved in creating interactive projects.
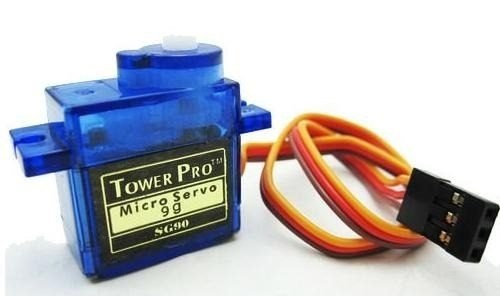
Servo Motor :
The operation of servo motors involves the transmission of an electrical pulse width modulation (PWM) through the control wire. This system consists of a minimum pulse, a maximum pulse, and a repetition rate. Servo motors have the ability to rotate approximately 180 degrees, with 90 degrees available in each direction.Wire Description:
RED – Positive (VCC)Brown – Negative (GND)
Orange – Signal (PWM)
Specifications:
- Operating Voltage is +5V typically
- Torque: 1.2kg/cm
- Operating speed is 0.1s/60°
- Rotation : 0°-180°
- Weight of motor : 9gm
Jumper Wires:
A jumper wire is an electrical wire equipped with a connector or pin at each end. Typically used in electronics, it serves to interconnect components without the need for soldering, providing a convenient and flexible means of establishing electrical connections.Connection Diagram:
Establish connections between your components according to the diagram, and link the USB cable from the Arduino to your computer.
- The power wire is red, and should be connected to the 5V pin on the Arduino board.
- The ground wire is - black or brown and should be connected to a ground pin on the board.
- The signal pin is - yellow or orange and should be connected to pin 9 on the board.
Adding the Servo.h library:
In this tutorial important
to add library to your Arduino IDE. Servo library is inbuilt library. If you
want to add Servo.h to Arduino sketch follow below steps.
In the Arduino IDE, go to Sketch >>
Include Library >> Add Servo library.
Arduino Code:
#include <Servo.h>
Servo myservo; // create
servo object to control a servo
int pos = 0; // variable to
store the servo position
void setup() {
myservo.attach(9); //
attaches the servo on pin 9 to the servo object
}
void loop() {
// goes from 0 degrees to 180
degrees
for (pos = 0; pos <= 180;
pos += 1) {
// in steps of 1 degree
myservo.write(pos); // tell
servo to go to position in variable 'pos'
delay(15); // waits 15ms for
the servo to reach the position
}
// goes from 180 degrees to 0
degrees
for (pos = 180; pos >= 0;
pos -= 1) {
myservo.write(pos); // tell
servo to go to position in variable 'pos'
delay(15); // waits 15ms for
the servo to reach the position
}
}
Upload:
Connect Arduino board to computer using USB cable and
wait for few seconds then it will show you "Com port".
Check your Com Port and Board Selection before upload Arduino code.
Additional Projects

Subscribe to:
Post Comments
(
Atom
)
Internet of Things
What is Internet of Things?
What is IoT? The Internet of Things (IoT) is the network of physical objects/things are embedded with software, sensors, and hardw...


No comments :
Post a Comment